
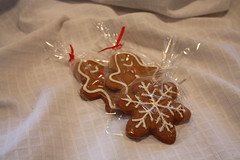
Gingerbread is a large part of our Christmas at the Bakery. This year we baked gingerbread men and snowflakes as part of our Holiday Cookie Exchange that has raised over $1700 in the last two years.
Happy Holidays!!
Thursday, December 31, 2009
Sunday, December 27, 2009
Polls are OPEN!
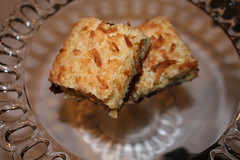
The Sweetest Kitchen hosted December's Cupcake Hero challenge ~ VOTE NOW for your favourite cupcake ~ HINT: Scroll to the end for Whimsical Bakery's submission!
Saturday, December 19, 2009
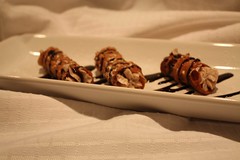
Cupcake Hero ~ Coconut Cupcakes
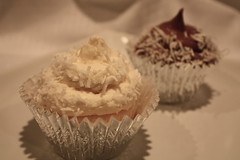
A new cupcake challenge this month ~ Cupcake Hero ~ flavour for November is "Coconut".
We chose a Coconut Cupcake with Cream Cheese Frosting & Chocolate Frosting. Finished with coconut shavings.
We chose a Coconut Cupcake with Cream Cheese Frosting & Chocolate Frosting. Finished with coconut shavings.
Recipe taken from Martha Stewart ~
Makes two dozen cupcakes
3 cups cake flour (not self-rising)
1 teaspoon baking powder
1/2 teaspoon baking soda
1/2 teaspoon salt
5 large eggs
3/4 pound (3 sticks) unsalted butter, room temperature
2 cups sugar
1 1/2 teaspoons pure vanilla extract
1 1/2 teaspoons almond extract
1 cup buttermilk
1 pound sweetened flake coconut
Cream Cheese Frosting
Directions
Heat oven to 350 degrees. Sift the dry ingredients together into a medium mixing bowl, and set the bowl aside. Break eggs into a small bowl, and set aside.
In the bowl of an electric mixer fitted with the paddle attachment, cream butter and sugar until light and fluffy, 3 to 5 minutes. With the mixer running, carefully pour in eggs and vanilla and almond extracts.
Mix in the flour mixture and buttermilk by alternating between 1 cup flour and 1/2 cup buttermilk; be sure to start and end with the flour mixture. Add half the coconut, and mix until just incorporated.
Line a cupcake tin with paper liners. Fill each cup with batter using an ice-cream scoop with a 1/4-cup capacity; the batter should nearly reach the tops of the cups. Bake until a cake tester inserted in the center comes out clean, 25 to 30 minutes.
Remove cupcakes from the oven, and allow them to cool briefly in the tin before transferring them to a wire rack to cool completely, about 45 minutes. Generously ice them with cream cheese frosting, and sprinkle with remaining coconut.
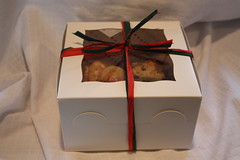
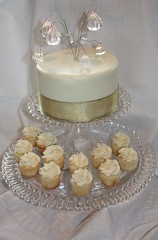
Holiday Cookie Gift Box
THANK YOU for all your holiday cookies orders and your support for Women's Community House.
Our Family to Yours, we wish you a Very Merry Christmas!
Our Family to Yours, we wish you a Very Merry Christmas!
Tuesday, December 15, 2009
National Cupcake Day ~ December 15th
For ~ National Cupcake Day we are featuring our Christmas Trio.
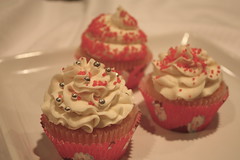
Available in classic vanilla, zesty lemon and old fashion chocolate topped with vanilla bean frosting, peppermint sprinkles and silver dredges. Visit our website and order today ~ www.whimsicalbakery.ca
Friday, December 4, 2009
Cookie Carnival ~ Pecan Pie Cookies
 November's Cookie Carnival recipe was Pecan Pie Cookies ~ a quick and easy cookie to make and taste just like pecan pie ~ definitely a new favourite at the bakery.
Cookie Ingredients:
1 cup firmly packed brown sugar
3/4 cup butter, softened
1 egg
1 tsp vanilla
2 cups all-purpose flour
1 tsp baking powder
Filling Ingredients:
1 cup chopped pecans
1/2 cup firmly packed brown sugar
1/4 cup whipping cream
1 tsp vanilla
Heat oven to 350°F. Combine all cookie ingredients except flour and baking powder in large bowl. Beat at medium speed until creamy. Reduce speed to low; add flour and baking powder. Beat until well mixed.
Shape dough into 1 1/4-inch balls. Place 2 inches apart onto ungreased cookie sheets. Make indentation in each cookie with thumb; rotate thumb to hollow out slightly.
Combine all filling ingredients in small bowl; fill each cookie with 1 rounded teaspoon filling. Bake for 8 to 12 minutes or until lightly browned. Cool 1 minute; remove from cookie sheets.

Thursday, November 26, 2009
Daring Bakers ~ Canolli
The November 2009 Daring Bakers Challenge was chosen and hosted by Lisa Michele of Parsley, Sage, Desserts and Line Drives. She chose the Italian Pastry, Cannolo (Cannoli is plural), using the cookbooks Lidia’s Italian-American Kitchen by Lidia Matticchio Bastianich and The Sopranos Family Cookbook by Allen Rucker; recipes by Michelle Scicolone, as ingredient/direction guides. She added her own modifications/changes, so the recipe is not 100% verbatim from either book.
Lidisano’s Cannoli
Makes 22-24 4-inch cannoli
Prep time:
Dough – 2 hours and 10-20 minutes, including resting time, and depending on whether you do it by hand or machine.
Filling – 5-10 minutes plus chilling time (about 2 hours or more)
Frying – 1-2 minutes per cannoli
Assemble – 20–30 minutes
RECIPE NOTE: THE EQUIVALENTS FROM THIS RECIPE WERE PREPARED USING THIS CONVERSION SITE: http://www.gourmetsleuth.com/index.asp.
CANNOLI SHELLS
2 cups (250 grams/8.82 ounces) all-purpose flour
2 tablespoons(28 grams/1 ounce) sugar
1 teaspoon (5 grams/0.06 ounces) unsweetened baking cocoa powder
1/2 teaspoon (1.15 grams/0.04 ounces) ground cinnamon
1/2 teaspoon (approx. 3 grams/0.11 ounces) salt
3 tablespoons (42 grams/1.5 ounces) vegetable or olive oil
1 teaspoon (5 grams/0.18 ounces) white wine vinegar
Approximately 1/2 cup (approx. 59 grams/approx. 4 fluid ounces/approx. 125 ml) sweet Marsala or any white or red wine you have on hand
1 large egg, separated (you will need the egg white but not the yolk)
Vegetable or any neutral oil for frying – about 2 quarts (8 cups/approx. 2 litres)
1/2 cup (approx. 62 grams/2 ounces) toasted, chopped pistachio nuts, mini chocolate chips/grated chocolate and/or candied or plain zests, fruits etc.. for garnish
Confectioners' sugar
Note - If you want a chocolate cannoli dough, substitute a few tablespoons of the flour (about 25%) with a few tablespoons of dark, unsweetened cocoa powder (Dutch process) and a little more wine until you have a workable dough (Thanks to Audax).
CANNOLI FILLING
2 lbs (approx. 3.5 cups/approx. 1 kg/32 ounces) ricotta cheese, drained
1 2/3 cups cup (160 grams/6 ounces) confectioner’s sugar, (more or less, depending on how sweet you want it), sifted
1/2 teaspoon (1.15 grams/0.04 ounces) ground cinnamon
1 teaspoon (4 grams/0.15 ounces) pure vanilla extract or the beans from one vanilla bean
3 tablespoons (approx. 28 grams/approx. 1 ounce) finely chopped good quality chocolate of your choice
2 tablespoons (12 grams/0.42 ounces) of finely chopped, candied orange peel, or the grated zest of one small to medium orange
3 tablespoons (23 grams/0.81 ounce) toasted, finely chopped pistachios
Note - If you want chocolate ricotta filling, add a few tablespoons of dark, unsweetened cocoa powder to the above recipe, and thin it out with a few drops of warm water if too thick to pipe.
DIRECTIONS FOR SHELLS:
1. In the bowl of an electric stand mixer or food processor, combine the flour, sugar, cocoa, cinnamon, and salt. Stir in the oil, vinegar, and enough of the wine to make a soft dough. Turn the dough out onto a lightly floured surface and knead until smooth and well blended, about 2 minutes. Shape the dough into a ball. Cover with plastic wrap and let rest in the fridge from 2 hours to overnight.
2 Cut the dough into two pieces. Keep the remaining dough covered while you work. Lightly flour a large cutting or pastry board and roll the dough until super thin, about 1/16 to 1/8” thick (An area of about 13 inches by 18 inches should give you that). Cut out 3 to 5-inch circles (3-inch – small/medium; 4-inch – medium/large; 5-inch;- large. Your choice). Roll the cut out circle into an oval, rolling it larger and thinner if it’s shrunk a little.
3 Oil the outside of the cannoli tubes (You only have to do this once, as the oil from the deep fry will keep them well, uhh, oiled..lol). Roll a dough oval from the long side (If square, position like a diamond, and place tube/form on the corner closest to you, then roll) around each tube/form and dab a little egg white on the dough where the edges overlap. (Avoid getting egg white on the tube, or the pastry will stick to it.) Press well to seal. Set aside to let the egg white seal dry a little.
4. In a deep heavy saucepan, pour enough oil to reach a depth of 3 inches, or if using an electric deep-fryer, follow the manufacturer's directions. Heat the oil to 375°F (190 °C) on a deep fry thermometer, or until a small piece of the dough or bread cube placed in the oil sizzles and browns in 1 minute. Have ready a tray or sheet pan lined with paper towels or paper bags.
5. Carefully lower a few of the cannoli tubes into the hot oil. Do not crowd the pan. Fry the shells until golden, about 2 minutes, turning them so that they brown evenly.
8. Lift a cannoli tube with a wire skimmer or large slotted spoon, out of the oil. Using tongs, grasp the cannoli tube at one end. Very carefully remove the cannoli tube with the open sides straight up and down so that the oil flows back into the pan. Place the tube on paper towels or bags to drain. Repeat with the remaining tubes. While they are still hot, grasp the tubes with a potholder and pull the cannoli shells off the tubes with a pair of tongs, or with your hand protected by an oven mitt or towel. Let the shells cool completely on the paper towels. Place shells on cooling rack until ready to fill.
9. Repeat making and frying the shells with the remaining dough. If you are reusing the cannoli tubes, let them cool before wrapping them in the dough.
Pasta Machine method:
1. Divide the dough into 4 equal pieces. Starting at the middle setting, run one of the pieces of dough through the rollers of a pasta machine. Lightly dust the dough with flour as needed to keep it from sticking. Pass the dough through the machine repeatedly, until you reach the highest or second highest setting. The dough should be about 4 inches wide and thin enough to see your hand through
2. Continue rolling out the remaining dough. If you do not have enough cannoli tubes for all of the dough, lay the pieces of dough on sheets of plastic wrap and keep them covered until you are ready to use them.
3, Roll, cut out and fry the cannoli shells as according to the directions above.
DIRECTIONS FOR FILLING:
1. Line a strainer with cheesecloth. Place the ricotta in the strainer over a bowl, and cover with plastic wrap and a towel. Weight it down with a heavy can, and let the ricotta drain in the refrigerator for several hours to overnight.
2. In a bowl with electric mixer, beat ricotta until smooth and creamy. Beat in confectioner’s sugar, cinnamon, vanilla and blend until smooth. Transfer to another bowl and stir in chocolate, zest and nuts. Chill until firm.(The filling can be made up to 24 hours prior to filling the shells. Just cover and keep refrigerated).
ASSEMBLE THE CANNOLI:
1. When ready to serve..fill a pastry bag fitted with a 1/2-inch plain or star tip, or a ziplock bag, with the ricotta cream. If using a ziplock bag, cut about 1/2 inch off one corner. Insert the tip in the cannoli shell and squeeze gently until the shell is half filled. Turn the shell and fill the other side. You can also use a teaspoon to do this, although it’s messier and will take longer.
2. Press or dip cannoli in chopped pistachios, grated chocolate/mini chocolate chips, candied fruit or zest into the cream at each end. Dust with confectioner’s sugar and/or drizzles of melted chocolate if desired.
Tuesday, November 24, 2009
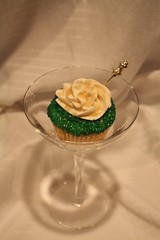
Apple-tini
A new cupcake challenge this month ~ Iron Cupcake Earth ~ flavour for November is "Apple" Thank you to I Heart Cuppiecakes for the inspiration.
We chose an Apple Cupcake with Cinnamon Buttercream Frosting.
Finished with green apple sprinkles and caramel drizzle.
I am competing to win the following prizes from our generous IronCupcake:Earth Prize Providers:
•The Demy™ by Key Ingredient
•Hello, Cupcake by Karen Tack & Alan Richardson
•Bella Cupcake Couture
•Cupcake Stackers by Gourmac
•The Cake Mix Doctor Returns! by Anne Byrne
•Beautiful Baking Liners by Vestli House
•Sweet Cuppin' Cakes Bakery & Cupcakey Supply
Please visit this website to vote for my cupcake entry: NO ONE PUTS CUPCAKE IN A CORNER
Voting will be open from November 27th 8pm to December 3rd at 12pm.
Apple Cupcakes ~ Food Network Kitchens
Prep Time: 40 min
Inactive Prep Time: 1 hr 0 min
Cook Time: 20 min
Serves: 24 cupcakes
Ingredients
For the cake:
1 cup (2 sticks) unsalted butter, at room temperature
1 cup vanilla sugar (see Cook's Note)
3 large eggs
1 1/2 teaspoons pure vanilla extract
2 1/4 cups all-purpose flour
1/2 teaspoon nutmeg
1 teaspoon baking soda
1/2 teaspoon fine salt
1/2 cup sour cream
1 large Gala or other baking apple, peeled, cored, and finely chopped (about 1 cup)
1/2 cup apple butter
Special equipment: 2 (12-cup) muffin pans
Directions
Preheat oven to 350 degrees F. Line 24 muffin tins with paper liners.
Using a hand mixer or standing mixer, cream the butter and vanilla sugar together until fluffy, about 2 to 3 minutes. Add eggs, one at a time and vanilla extract, beating until smooth.
Combine the flour, nutmeg, baking soda and salt in a medium bowl. Add half the flour mixture to the creamed butter, then add the sour cream, and then the rest of the flour. Beat until well combined, taking care not to over mix. Gently fold in the chopped apples.
Divide batter between prepared muffin tins, filling them 1/2 way full. Bake until a toothpick inserted into the center of the cupcakes comes out clean and the tops spring back when pressed gently, about 20 minutes. Cool the cupcakes in the tin on a rack for 10 minutes then remove from the tin and cool completely.
Put apple butter into a small pastry bag with an open tip Squeeze a small amount into the center of each cupcake. Continue cooling completely. Then frost with icing.
Cinnamon Buttercream Frosting
1/2 cup butter, room temperature
3 3/4 cups powdered sugar, sifted
3-4 tablespoons milk
1 teaspoon vanilla extract
1 teaspoon cinnamon
1. Place butter in large bowl.
2. Beat on low 30 seconds.
3. Add sugar about a cup at a time, beating on low betweeneach addition.
4. Add 3 tablespoons milk, vanilla and cinnamon.
5. Beat on medium 1 minute.
6. Blend in up to 1 tablespoons of milk if frosting is too thick.
Thursday, November 12, 2009
Holiday Cookies
 Imagine a beautiful assortment of homemade cookies for a holiday dessert table or a knockout gift.Even if you love to bake, and even if your fondest memories involve marathon cookie baking, such a dazzling array can be a challenge in these busy times.
 ~ We have the solution ~
~ Order your holiday cookies today and help benefit ~
Women's Community House
Saturday, October 31, 2009

Cookie Carnival ~ Chocolate Citrus Biscotti

October's Cookie Carnival recipe comes from the food network ~ Chocolate Citrus Biscotti
- Prep Time:
- 15 min
- Inactive Prep Time:
- 10 min
- Cook Time:
- 1 hr 10 min
- Level:
- Easy
- Serves:
- 3 dozen
Ingredients
- 2 cups all-purpose flour
- 3/4 cup fine yellow cornmeal
- 1 1/2 teaspoons baking powder
- 1 teaspoon salt
- 3 large eggs
- 1 cup sugar
- 1 tablespoon orange zest
- 1 tablespoon lemon zest
- 1 3/4 cups semisweet chocolate chips
- 2 tablespoons unsweetened cocoa powder
Directions
Preheat the oven to 325 degrees F.
Line a large baking sheet with parchment paper. Stir the flour, cornmeal, baking powder, and salt in a large bowl. Using an electric mixer, beat the eggs and sugar in another large bowl until pale yellow and fluffy, about 3 minutes. Add the orange and lemon zests to the dry ingredients. Add the flour mixture to the eggs and sugar and beat just until blended (the dough will be soft and sticky). Let stand for 5 minutes.
Using a rubber spatula, transfer the dough to the prepared baking sheet, forming two mounds spaced evenly apart. Moisten your hands with water and shape the dough into two 11 by 4-inch logs. Bake until lightly brown, about 35 minutes. Cool the logs for 5 minutes. Using a serrated knife, cut the logs crosswise into 1/2-inch-thick diagonal slices. Arrange the biscotti cut side down on the same baking sheet. Bake until the biscotti are pale and golden, about 25 minutes. Cool the biscotti on the baking sheet for 5 minutes. Using a metal spatula, transfer the biscotti to a rack and cool completely.
Melt the chocolate chips in the microwave, stirring every 20 seconds, about 1 1/2 minutes total. Dip 1 cut side of each biscotti into the melted chocolate. Gently shake off the excess chocolate. Place the biscotti, chocolate side up, on the baking sheet. Refrigerate until the chocolate is firm, about 35 minutes. Dip a pastry brush in the cocoa, then lightly brush the cocoa over the chocolate on each biscotti.
The biscotti can be made ahead. Store them in an airtight container up to 4 days, or wrap them in foil and freeze in resealable plastic bags up to 3 weeks.
Daring Bakers ~ French Macaroon

The October Daring Baker's challenge was brought to us by Ami S. She chose macaroons from Claudia Fleming's The Last Course: the Desserts of Gramercy Tavern as the challenge recipe.
More than a few have suggested that French-style macaroons (called macarons in France) might supplant the cupcake. This may or may not come to pass, but the basic premise of the French macaroon is pretty damned tasty.
Preparation time: Not taking into account the amount of time it takes for you to bring your egg whites to room temperature, the whole baking process, including making the batter, piping and baking will probably take you about an hour to an hour and a half. How long it takes to make your filling is dependent on what you choose to make.
Actual baking time: 12 minutes total, plus a few minutes to get your oven from 200°F to 375°F.
Equipment required:
• Electric mixer, preferably a stand mixer with a whisk attachment
• Rubber spatula
• Baking sheets
• Parchment paper or nonstick liners
• Pastry bag (can be disposable)
• Plain half-inch pastry bag tip
• Sifter or sieve
• If you don’t have a pastry bag and/or tips, you can use a Ziploc bag with the corner snipped off
• Oven
• Cooling rack
• Thin-bladed spatula for removing the macaroons from the baking sheets
• Food processor or nut grinder, if grinding your own nuts (ouch!)
Ingredients
Confectioners’ (Icing) sugar: 2 ¼ cups (225 g, 8 oz.)
Almond flour: 2 cups (190 g, 6.7 oz.)
Granulated sugar: 2 tablespoons (25 g , .88 oz.)
Egg whites: 5 (Have at room temperature)
Directions:
1. Preheat the oven to 200°F (93°C). Combine the confectioners’ sugar and almond flour in a medium bowl. If grinding your own nuts, combine nuts and a cup of confectioners’ sugar in the bowl of a food processor and grind until nuts are very fine and powdery.
2. Beat the egg whites in the clean dry bowl of a stand mixer until they hold soft peaks. Slowly add the granulated sugar and beat until the mixture holds stiff peaks.
3. Sift a third of the almond flour mixture into the meringue and fold gently to combine. If you are planning on adding zest or other flavorings to the batter, now is the time. Sift in the remaining almond flour in two batches. Be gentle! Don’t overfold, but fully incorporate your ingredients.
4. Spoon the mixture into a pastry bag fitted with a plain half-inch tip (Ateco #806). You can also use a Ziploc bag with a corner cut off. It’s easiest to fill your bag if you stand it up in a tall glass and fold the top down before spooning in the batter.
5. Pipe one-inch-sized (2.5 cm) mounds of batter onto baking sheets lined with nonstick liners (or parchment paper).
6. Bake the macaroon for 5 minutes. Remove the pan from the oven and raise the temperature to 375°F (190°C). Once the oven is up to temperature, put the pans back in the oven and bake for an additional 7 to 8 minutes, or lightly colored.
7. Cool on a rack before filling.
Yield: 10 dozen. Ami's note: My yield was much smaller than this. I produced about two dozen filled macaroons.
Saturday, October 10, 2009
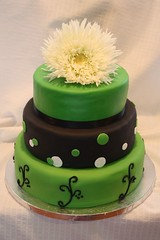
Fall Wedding
Perfect for a fall wedding at the Bellamere Winery, this three tier cake featured a top tier of pumpkin spice cake with cream cheese buttercream, middle tier of old fashion chocolate with chocolate buttercream and a first tier of traditional carrot cake filled with cream cheese buttercream.
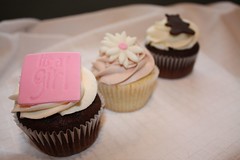
Baby Shower Trio
Cupcakes of old fashion chocolate with vanilla buttercream frosting along with classic vanilla with a strawberry buttercream frosting, completed with sugar toppers of teddy bears, daisy flower, and "it's a girl" messages.
The perfect addition to the dessert table at this baby shower.
The perfect addition to the dessert table at this baby shower.
Tuesday, September 29, 2009
Cookie Carnival ~ Black Bottom Coconut Bar
September's challenge for the Cookie Carnival was a wonderful coconut bar from Martha Stewart's website ~
INGREDIENTS
Makes 24
FOR CHOCOLATE BASE
1/2 cup (1 stick) unsalted butter, plus more for pan
1/2 cup sugar
1/4 teaspoon salt
1 large egg
1/4 cup unsweetened cocoa powder
1/4 cup all-purpose flour (spooned and leveled)
FOR COCONUT TOPPING
2 large eggs
3/4 cup sugar
1/2 teaspoon vanilla extract
1 cup all-purpose flour (spooned and leveled)
1 package sweetened shredded coconut (7 ounces), 1/2 cup reserved for sprinkling
DIRECTIONS
For chocolate base: Preheat oven to 375 degrees. Line a 9-inch square baking pan with aluminum foil, leaving a slight overhang; butter bottom and sides of foil (not overhang).
Place butter in a large microwave-safe bowl; melt in microwave. Add sugar and salt; whisk to combine. Whisk in egg, then cocoa and flour until smooth. Spread batter in prepared pan.
Bake just until sides begin to pull away from edges of pan, 10 to 15 minutes (do not overbake). Let cool slightly while preparing coconut topping. Keep oven on for topping.
For coconut topping: In a medium bowl, whisk eggs with sugar and vanilla. Gently mix in flour and coconut (except 1/2 cup reserved for sprinkling).
Drop mounds of mixture over chocolate base; spread and pat in gently and evenly with moistened fingers. Sprinkle with reserved 1/2 cup coconut.
Bake until golden and a toothpick inserted in center comes out with moist crumbs attached, 25 to 30 minutes. Cool completely in pan. Lift cake from pan, peel off foil, and cut into 24 bars. Store in an airtight container 3 to 4 days.
Monday, September 28, 2009
60th Wedding Anniversary
Created for a 60th wedding anniversary this cupcake tower featured zesty lemon bite size cupcakes with buttercream frosting.
The cake was covered with ivory fondant topped with wired diamonds. Perfect for an afternoon tea event hosted at the Idlewyld Inn.
The cake was covered with ivory fondant topped with wired diamonds. Perfect for an afternoon tea event hosted at the Idlewyld Inn.
Sunday, August 30, 2009
Wedding Poka-Dots
This topsy turvy design was created for Jennifer & Steve's wedding held at the Hellenic Centre. Cake topper were the bride & grooms initials made in pink fondant.
Tiers were Classic Vanilla with Chocolate Buttercream; Chocolate Chip with Vanilla Buttercream and Old Fashion Chocolate with Vanilla Buttercream.
Jennifer also chose matching vanilla cupcakes for cupcake tower centerpieces on each table. Cupcakes were designed with both pink frosting with brown poka dots and brown frosting with pink poka dots.
Sunday, August 23, 2009
Little Prince
To celebrate their son's 1st birthday, we designed this cake topped with a crown fit for a little prince. Featuring all colours boy ~ brown & blue.
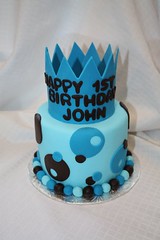
Three layers of Party Confetti filled with Vanilla Buttercream
Sunday, August 2, 2009
Poker Night at the Movies
These cupcakes were designed for a 40th birthday being celebrated at the VIP lounge of the new Cineplex Odeon ~ the birthday girl enjoys a good game of poker.
Cupcakes were classic vanilla and old fashion chocolate with cream cheese buttercream, topped with fondant poker symbols.
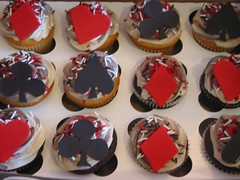
Cupcakes were classic vanilla and old fashion chocolate with cream cheese buttercream, topped with fondant poker symbols.
Tuesday, July 28, 2009
Topsy Turvy

Bottom tier was classic vanilla with raspberry buttercream filling and the top tier classic vanilla with chocolate buttercream filling.
Saturday, July 25, 2009
Cupcakes & Candy
Created as a topper for a cupcake tower this two tier wedding cake sat among a buffet of vintage candy jars and sweets.

Both layers of old fashion vanilla with a raspberry buttercream filling. Our first delivery to Bellamere Winery in Hyde Park, what a beautiful venue.
Thursday, July 9, 2009
Mini Cooper for Charity
Grand Touring Cars hosted their annual Girls Night Out charity event, this year for FACE IT.
The bakery created a replica of the Mini Cooper they were going to have on display with a pink ribbon decal and a burberry roof.
Daisy stickers were sold to raise money for the Face It program. and stuck to the car which will be driven to various festivals and events in London this summer.

The bakery created a replica of the Mini Cooper they were going to have on display with a pink ribbon decal and a burberry roof.
Daisy stickers were sold to raise money for the Face It program. and stuck to the car which will be driven to various festivals and events in London this summer.
Tuesday, June 30, 2009
Graduation Stars
Asked to design a cake for a graduate of Kings College at U.W.O. we have featured the school colours along with a sugar paste diploma and shooting stars ~ Cake was party confetti with buttercream filling.
Trudy's comments ...
The party was a great success and the cake was a hit!!
Thanks.
Welcome Neighbour

To welcome a new neighbour we were asked to design a cake themed from "Tool Time's" neighbour Wilson ~ since the family was also celebrating a birthday we created a two sided cake, one side for each occasion ~ Lemon Vanilla with a Raspberry Buttercream filling.

Thursday, June 4, 2009
Baby Shower

To welcome a new grandson, this cake is topped with sugar baby booties. Top tier is old fashion chocolate with vanilla buttercream, covered in chocolate fondant. Bottom tier is classic vanilla with a vanilla buttercream filling.
Wednesday, May 27, 2009
Palm Trees & Flip Flops
These cupcakes left town for a Beach themed bridal shower. Classic Vanilla cupcakes with vanilla buttercream frosting topped with edible beach sand, chocolate palm trees and flip flops.
Janet's comments ...
They were beautiful. BIG HIT at the shower.
Thank you, Janet
Janet's comments ...
They were beautiful. BIG HIT at the shower.
Thank you, Janet
Monday, May 18, 2009
Boston Marathon
This cake was designed for a surprise 50th birthday party where the birthday 'boy' had just ran his fourth Boston marathon. The shoebox is orange carrot cake filled with cream cheese butter cream and the running shoe is classic vanilla with a vanilla butter cream filling. The party was held at Cirillo's Culinary Academy in Toronto, what a fabulous facility for cooking classes and corporate events.

Monday, May 11, 2009
Whimsical Circles & Dots
This fun four tier cake features random shaped circles & dots with a topper of wired balls. Delivered to the Museum London for Kyrsta & Tony's wedding this past Saturday. Cake tiers were Classic Vanilla with Chocolate Truffle; Old Fashion Chocolate with Vanilla Buttercream; Chocolate Chip with Vanilla Buttercream.
Kyrsta's Comments:
The cake was amazing, of course. We had a great time and really appreciated your effort.
Thanks so much,
Kyrsta
Thursday, May 7, 2009
BEElicious!!
Our cake designer Shannon wanted to treat her friend to an extra special birthday. Shannon designed this beehive cake ~ Classic Vanilla filled with White Chocolate buttercream.
Happy Birthday Heather!
Happy Birthday Heather!
Monday, May 4, 2009
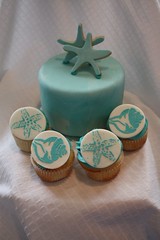
Seaside Wedding
We designed this cupcake tower for a couple married in the islands and enjoyed their wedding reception this weekend in London. The wedding theme was a seaside wedding, starfish, shells ~ the cake topper was Classic Vanilla with buttercream filling.
Thursday, April 30, 2009
Kitty Cat Cake
I have been wanting to start creating sugarpaste characters.
My sister-in-law celebrated her birthday this week ~ and being a cat lover ... Too cute for words ~ cake was orange carrot with a cream cheese filling.
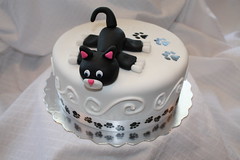
My sister-in-law celebrated her birthday this week ~ and being a cat lover ... Too cute for words ~ cake was orange carrot with a cream cheese filling.
Monday, April 27, 2009
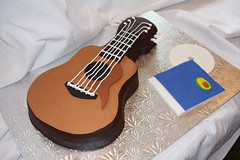
Acoustic Guitar
Whew, another busy week at the bakery ~ this week we finished off with a cake carved into a guitar with a pearl jam CD & case. Designed by our resident cake designer Shannon for a farewell party to a great friend ~ off to find a job in the big city. Old Fashion Chocolate cake filled with chocolate truffle buttercream, DELISH!
Daring Bakers ~ Classic Cheesecake
Daring Bakers April challenge is a classic cheesecake.

Always a favourite but a 10" cake is too much for my small family ~ so out come the mini spring form pans. Variations were offered but I like to try a recipe as stated the first time to ensure success, then add variations once it is a keeper in the trusted recipe binder.
With the warm weather finally here, and thinking of summer ~ I added a fresh blackberry sauce as the topping.
The April 2009 challenge is hosted by Jenny from Jenny Bakes. She has chosen Abbey's Infamous Cheesecake as the challenge.
bbey's Infamous Cheesecake:
crust:
2 cups / 180 g graham cracker crumbs
1 stick / 4 oz butter, melted
2 tbsp. / 24 g sugar
1 tsp. vanilla extract
cheesecake:
3 sticks of cream cheese, 8 oz each (total of 24 oz) room temperature
1 cup / 210 g sugar
3 large eggs
1 cup / 8 oz heavy cream
1 tbsp. lemon juice
1 tbsp. vanilla extract (or the innards of a vanilla bean)
1 tbsp liqueur, optional, but choose what will work well with your cheesecake
DIRECTIONS:
1. Preheat oven to 350 degrees F (Gas Mark 4 = 180C = Moderate heat). Begin to boil a large pot of water for the water bath.
2. Mix together the crust ingredients and press into your preferred pan. You can press the crust just into the bottom, or up the sides of the pan too - baker's choice. Set crust aside.
3. Combine cream cheese and sugar in the bowl of a stand-mixer (or in a large bowl if using a hand-mixer) and cream together until smooth. Add eggs, one at a time, fully incorporating each before adding the next. Make sure to scrape down the bowl in between each egg. Add heavy cream, vanilla, lemon juice, and alcohol and blend until smooth and creamy.
4. Pour batter into prepared crust and tap the pan on the counter a few times to bring all air bubbles to the surface. Place pan into a larger pan and pour boiling water into the larger pan until halfway up the side of the cheesecake pan. If cheesecake pan is not airtight, cover bottom securely with foil before adding water.
5. Bake 45 to 55 minutes, until it is almost done - this can be hard to judge, but you're looking for the cake to hold together, but still have a lot of jiggle to it in the center. You don't want it to be completely firm at this stage. Close the oven door, turn the heat off, and let rest in the cooling oven for one hour. This lets the cake finish cooking and cool down gently enough so that it won't crack on the top. After one hour, remove cheesecake from oven and lift carefully out of water bath. Let it finish cooling on the counter, and then cover and put in the fridge to chill. Once fully chilled, it is ready to serve.
Cookie Carnival ~ Toasted Almond Lemon Bars
The challenge for April with Cookie Carnival was not a cookie at all ~ but a bar!!
What a nice treat the lemon is very tangy and the almond shortbread crust a new FAVOURITE.

Toasted Almond Lemon Bars
From The Sweet Melissa Baking Book by Melissa Murphy
Makes 1 dozen bars
"Everyone loves lemon bars. I make mine extra special by adding toasted almonds to the shortbread crust."
For the Crust:
2 cups all-purpose flour
3/4 cup confectioners' sugar
1/2 cup sliced blanched almonds, lightly toasted
1/2 teaspoon salt
20 Tablespoons (2 1/2 sticks) cold, unsalted butter, cut into 1/4-inch pieces
For the Lemon Filling:
4 large eggs
1 3/4 cups sugar
1/2 teaspoon almond extract
1/2 cup all-purpose flour
3/4 cup fresh lemon juice (about 7 lemons)
1/4 cup confectioners' sugar for sprinkling
To Toast the Almonds:
Preheat the oven to 350 degrees F. Spread the almonds in a single layer on a cookie sheet. Bake for 10 to 12 minutes, or until lightly golden and you can smell them. Remove to a wire rack to cool.
Before You Start:
Position a rack in the center of your oven. Preheat the oven to 350 degrees F. Spray a 9 x 13 - inch pan with nonstick vegetable cooking spray. Make a parchment "sling" by cutting two pieces of parchment paper, measuring 16 1/2 inches long by 12 inches wide (you can also use aluminum foil). Place one piece across the length, and the other across the width of the pan, with the excess hanging over the edges. You will use this sling later to lift the finished bar from the pan. Spray the sling with the cooking spray.
To Make the Crust:
1. In the bowl of a food processor fitted with the metal blade, pulse the flour, sugar, almonds, and salt to combine. Add the cold butter in pieces and pulse until the dough comes together in a ball.
2. Turn the dough out into the prepared pan and press evenly into the bottom and 1 1/4 inches up the sides. (This crust, once it is baked, needs to act as a liner in which to pour the liquidy lemon filling. So be sure to do a good job of pressing the dough up the sides - no cracks!). Cover the dough with a piece of parchment paper or aluminum foil, and fill with pie weights ( you can use dried beans or uncooked rice as pie weights as well). Bake for 25 to 30 minutes, or until lightly golden. Carefully remove the pie weights and the liner and bake for an additional 10 to 15 minutes, or until the whole crust is golden. Remove to a wire rack to cool.
To Make the Filling:
In a medium bowl, whisk together the eggs and sugar until smooth. Add the almond extract and flour, and whisk until smooth. Add the lemon juice, and whisk to combine.
To Complete the Bars:
1. Pour the lemon filling into the prepared crust. Reduce the oven temperature to 325 degrees F. Bake for 30 minutes, or until the filling is firm and lightly golden. Remove to a wire rack to cool.
2. When cool use the parchment sling to lift the entire bar from the pan and onto a cutting board. Slice into twelve 3 x 3 1/2 - inch bars. Remove from the pan and, using a small sifter, dust with the confectioners' sugar.
The bars keep in an airtight container at room temperature for up to 2 days. For longer storage, wrap in plastic wrap and refrigerate for up to 5 days, or freeze well wrapped in plastic wrap and then aluminum foil for up to 3 weeks. Do not unwrap before defrosting. Dust with confectioners' sugar before serving.
Sunday, April 5, 2009
Spring Wedding
What a busy week in the bakery ~ Spring in the air and Easter fast approaching.
Working with Jennifer at Occasions Event Planning ~ creating a cake tower filled with bite-size vanilla and chocolate cupcakes with buttercream frosting.
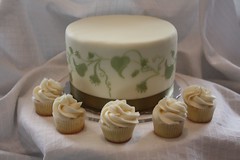
The topper cake was a luscious lemon pound cake with raspberry buttercream filling ~ covered in ivory fondant and a cascading ivy design. The wedding was held at the Marconi Club in London.
Working with Jennifer at Occasions Event Planning ~ creating a cake tower filled with bite-size vanilla and chocolate cupcakes with buttercream frosting.
The topper cake was a luscious lemon pound cake with raspberry buttercream filling ~ covered in ivory fondant and a cascading ivy design. The wedding was held at the Marconi Club in London.
Sunday, March 29, 2009
Cupcakes for Lunch
Ordered for a site tour and luncheon with the Canadian Breast Cancer Society; this group was in London reviewing sites for an upcoming convention. Looking for the edge to be remembered by ~ the convention centre ordered cupcakes with the breast cancer ribbon topper to be served for dessert. For added sparkle, each ribbon was brushed with pink pearl powder.
GOOD LUCK LONDON!

GOOD LUCK LONDON!
Sunday, March 22, 2009
Women's Lifestyle Show

This weekend the bakery participated in the Women's Lifestyle Show at the London Convention center. We designed a feature cake "Cinderella" ~ the shoe is entirely make of gum paste. The shoe box is all cake and can be designed to match your favourite pair of shoes. The perfect cake for a milestone birthday, bridal shower or girls night out.
Tuesday, March 17, 2009
Breakfast Meeting for Women Fundraiser

THANK YOU to Chef David at the London Convention Centre for working with the Whimsical Bakery on the dessert for the Breakfast Meeting for Women annual fundraiser. The Bakery created southern red velvet mini cupcakes with cream cheese frosting to compliment a trio of desserts from the Convention Centre. The theme for the fundraiser was "all about the accessories" so we thought a sugar purse would be the perfect topper for each mini cake.
Saturday, February 28, 2009
Daring Bakers ~ Chocolate Valentino Cake
This is my first challenge with Daring Bakers and I have to say we are off to a great start.
The February 2009 challenge is hosted by Wendy of WMPE's blog and Dharm of Dad ~ Baker & Chef. We have chosen a Chocolate Valentino cake by Chef Wan; a Vanilla Ice Cream recipe from Dharm and a Vanilla Ice Cream recipe from Wendy as the challenge.

As it is February and romance is in the air, I decided to bake the cake as individual hearts. Thrilled to be taking my ice cream maker out of storage I ventured forward with the traditional vanilla ice cream.

Chocolate Valentino
Preparation Time: 20 minutes
16 ounces (1 pound) (454 grams) of semisweet chocolate, roughly chopped
½ cup (1 stick) plus 2 tablespoons (146 grams total) of unsalted butter
5 large eggs separated
1. Put chocolate and butter in a heatproof bowl and set over a pan of simmering water (the bottom of the bowl should not touch the water) and melt, stirring often.
2. While your chocolate butter mixture is cooling. Butter your pan and line with a parchment circle then butter the parchment.
3. Separate the egg yolks from the egg whites and put into two medium/large bowls.
4. Whip the egg whites in a medium/large grease free bowl until stiff peaks are formed (do not over-whip or the cake will be dry).
5. With the same beater beat the egg yolks together.
6. Add the egg yolks to the cooled chocolate.
7. Fold in 1/3 of the egg whites into the chocolate mixture and follow with remaining 2/3rds. Fold until no white remains without deflating the batter. {link of folding demonstration}
8. Pour batter into prepared pan, the batter should fill the pan 3/4 of the way full, and bake at 375F/190C
9. Bake for 25 minutes until an instant read thermometer reads 140F/60C.
Note – If you do not have an instant read thermometer, the top of the cake will look similar to a brownie and a cake tester will appear wet.
10. Cool cake on a rack for 10 minutes then unmold.
Dharm's Ice Cream Recipe
Classic Vanilla Ice Cream
Preparation Time: 30 minutes
Recipe comes from the Ice Cream Book by Joanna Farrow and Sara Lewis (tested modifications and notes in parentheses by Dharm)
Ingredients
1 Vanilla Pod (or substitute with vanilla extract)
300ml / ½ pint / 1 ¼ cups Semi Skimmed Milk – in the U.S. this is 2% fat (or use fresh full fat milk that is pasteurised and homogenised {as opposed to canned or powdered}). Dharm used whole milk.
4 large egg yolks
75g / 3oz / 6 tbsp caster sugar {superfine sugar can be achieved in a food processor or use regular granulated sugar}
5ml / 1 tsp corn flour {cornstarch}
300ml / ½ pint / 1 ¼ cups Double Cream (48% butter fat) {in the U.S. heavy cream is 37% fat)
{you can easily increase your cream's fat content by heating 1/4 cup of heavy cream with 3 Tbs of butter until melted - cool to room temperature and add to the heavy cream as soon as whisk marks appear in the cream, in a slow steady stream, with the mixer on low speed. Raise speed and continue whipping the cream) or use heavy cream the difference will be in the creaminess of the ice cream.
1. Using a small knife slit the vanilla pod lengthways. Pour the milk into a heavy based saucepan, add the vanilla pod and bring to the boil. Remove from heat and leave for 15 minutes to allow the flavours to infuse
Lift the vanilla pod up. Holding it over the pan, scrape the black seeds out of the pod with a small knife so that they fall back into the milk. SET the vanilla pod aside and bring the milk back to the boil.
2. Whisk the egg yolks, sugar and corn-flour in a bowl until the mixture is thick and foamy. 3. Gradually pour in the hot milk, whisking constantly. Return the mixture to the pan and cook over a gentle hear, stirring all the time
4. When the custard thickens and is smooth, pour it back into the bowl. Cool it then chill.
5. By Hand: Whip the cream until it has thickened but still falls from a spoon. Fold it into the custard and pour into a plastic tub or similar freeze-proof container. Freeze for 6 hours or until firm enough to scoop, beating it twice (during the freezing process – to get smoother ice cream or else the ice cream will be icy and coarse)
By Using and Ice Cream Maker: Stir the cream into the custard and churn the mixture until thick (follow instructions on your ice cream maker)
Tuesday, February 17, 2009
Cookie Carnival ~ Chocolate Fudge, Toffee, Cherry Cookies
To add to the fun of baking I have joined a cookie bake club Cookie Carnival where each month we receive a cookie recipe to try out ~ much to my husbands delight he gets to be the cookie tester !
This months Chocolate Fudge, Toffee, Cherry cookie happens to top the list as a new favourite.
CHOCOLATE FUDGE COOKIES with TOFFEE and DRIED CHERRIES
makes 40 large cookies
INGREDIENTS
2 1/4 cups all-purpose flour
1/2 cup unsweetened dutch-process cocoa powder
1 teaspoon baking soda
1/4 teaspoon salt
1 cup unsalted butter, room temperature
1 cup tightly packed dark brown sugar
3/4 granulated sugar
2 large eggs
1 1/2 teaspoons pure vanilla extract
1 cup plump, moist, dried sour cherries
8 oz. bitter or semisweet chocolate chopped into chunks about the size of the cherries
1 cup English toffee pieces for baking such as Skor Bits
crisp on the outside, soft and chewy in the middle and downright gooey if you get to them still warm. these cookies are great for picnics and crowds and the dough can be frozen until you need it. the contrasting flavours and textures: rich, dark chocolate; sweet, crunchy toffee; and chewy tangy sour cherries, make these totally addictive--and a step up from the average chocolate cookie. make sure the cherries are plump and soft, not dry and hard. i like to make these pretty much fist- sized, but you can make them smaller if you wish. (don’t fool yourself; it just means you’ll eat more of them.) adjust baking time accordingly if you reduce the size of the cookies.
INSTRUCTIONS
1. preheat the oven to 350 degrees. line two heavy baking sheets, not non-stick, with parchment
paper and set aside. sift the flour, cocoa, baking soda and salt together into a bowl and set aside.
2. in a large mixing bowl or the bowl of an electric or stand mixer fitted with the paddle attachment,cream together the butter and both sugars until light in colour and fluffy, about 2 minutes. add the eggs, one at a time, beating well after each addition and scraping down the sides of the bowl.
3. beat in the vanilla. stir in the flour-mixture in 3 additions, blending just until the dry ingredients are moistened. i find this part of the job easier with a wooden spoon, rather than a mixer, as i can see better which parts of the batter need more attention without overmixing. stir in the chunky ingredients and mix until they seem evenly distributed. (the dough may be frozen at this point for up to 4 months: wrap the dough securely in plastic wrap, then in a plastic freezer bag. thaw the dough in the refrigerator without removing its wrapping before portioning the cookies and baking.)
4. drop the batter by heaping tablespoons onto the prepared baking sheets and place them in the center of the oven. if you have a large, evenly tempered oven, place the 2 sheets in at once, on two racks positioned close to the middle of the oven. switch the position of the trays once during baking. if your oven is small, or tends to have hot or cold spots, bake one tray at a time so the cookies bake evenly.
5. bake the cookies for 15-18 minutes, or until barely set in the center and just firm around the
edges. rotate the sheets once or twice. cool the cookies on the tray for 3-5 minutes, then transfer to wire rack to cool completely before storing. (feel free to eat them at any point.) run the hot tray under cold water to cool it, dry thoroughly and repeat with remaining dough. store the cookies in airtight containers, layered between sheets of parchment or waxed paper for up to 5 days.
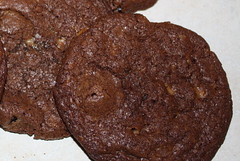
Chocolate Chip Cookies
Trying to decide on a treat to enjoy with friends and a cup of tea ~ I thought of the classic chocolate chip cookie and the perfect recipe from one of Anna Olson's cookbooks SUGAR ~

Bridal Show
WOW, so much has been happening at the bakery we haven't had a chance to post everything to our blog.

 for the late night buffet at a wedding.
Firstly, thank you to all the brides who stopped by our booth at the Sheraton Four Points in January ~ enjoying a sample of cupcakes.
~ the cupcake tower is still a popular favourite for all events, perfect for your wedding pictures and cake cutting ~ or a dessert sampler
for the late night buffet at a wedding.Our cake tasting events are booking quickly, held the first Sunday of each month ~ visit our website to arrange an appointment today ~ www.whimsicalbakery.ca
Tuesday, February 3, 2009
Superbowl XLIII
Created as a centerpiece for the buffet table ~ Superbowl weekend ~ entire helmet and field is make with cake, covered in fondant ~ helmet featured both team logos.

Tuesday, January 6, 2009
HAPPY NEW YEAR
 HAPPY NEW YEAR !
Things have settled down after the Christmas holidays at the bakery. THANK YOU to all that ordered holiday cookies, we were able to donate $1000 to the London Health Sciences Foundation and the Grace Donnelly Womens Centre.
The New Year starts the wedding season and dates for the spring and summer are filling up ~ we will be attending two bridal shows in London, visit our website for the dates and locations http://www.whimsicalbakery.ca/events.html ~ we will have various cake and frosting samples at each show. See you there!
Subscribe to:
Posts (Atom)

